On the day I took portraits for 'The Body' project I changed my lighting plan as there wasn't enough resources for everyone to use. My final lighting plan was too use a white background which is being lit by a broncolor with a large soft box on it. I used a large soft box to spread the light more equally on the background and so the lighting looks more soft as it will be diffused. I used two white polyboard's to reflect the soft box's light back on to the background and so it doesn't go on to the model. To light up the model I put a broncolor with a soft box lantern on to a boom arm, directly above the camera so it was lighting up the model equally. I rolled up the curtains on the lantern attached to the boom arm to allow more light to shine on to the model.

I used Ilford black and white ISO 400 film for the photoshoot as I want the pictures to be low in contrast to give a softness to them. I decided to use a medium format camera, I choose the Mamiya RZ with a standard lens as I wanted a portrait styled photo and I didn't want the square format created by the Bronica. When I was taking the images I had to make sure the light hitting the background was two F stops smaller than the light hitting the model. This means that when I was shooting at F16 the aperture of the light on the background has to be F32 and the light shining on to the model had to be F16 and when I was shooting at F5.6 the light on the background had to F11 which means the light on the model should be F5.6. This is so the background isn't more brighter then the model so the model stands out. Once the model was in position I noticed that there was shadows on the models shoulders so I had to position her further away from the background and closer to the light on the boom arm so more light was shining on to the model. I also had to position the light on the boom arm closer to the model as there was shadows being cast under her neck. I had the model pose in different ways that looked very natural to emphasise the soft feel of the picture. In some of the pictures I had the model show some of her skin on her shoulder to make the image appear more natural and honest, I also had her look directly in the camera to create an intimate feel.

I used Ilford black and white ISO 400 film for the photoshoot as I want the pictures to be low in contrast to give a softness to them. I decided to use a medium format camera, I choose the Mamiya RZ with a standard lens as I wanted a portrait styled photo and I didn't want the square format created by the Bronica. When I was taking the images I had to make sure the light hitting the background was two F stops smaller than the light hitting the model. This means that when I was shooting at F16 the aperture of the light on the background has to be F32 and the light shining on to the model had to be F16 and when I was shooting at F5.6 the light on the background had to F11 which means the light on the model should be F5.6. This is so the background isn't more brighter then the model so the model stands out. Once the model was in position I noticed that there was shadows on the models shoulders so I had to position her further away from the background and closer to the light on the boom arm so more light was shining on to the model. I also had to position the light on the boom arm closer to the model as there was shadows being cast under her neck. I had the model pose in different ways that looked very natural to emphasise the soft feel of the picture. In some of the pictures I had the model show some of her skin on her shoulder to make the image appear more natural and honest, I also had her look directly in the camera to create an intimate feel.
Contact sheets
The first roll of film I took the negatives came out too thin. So when I took the next roll of film I increased the light intensity to make the portraits more brighter.


The first roll of film I took the negatives came out too thin. So when I took the next roll of film I increased the light intensity to make the portraits more brighter.


First print
I choose to print this negative from the second contact sheet I made. I liked the way the model was looking directly into the camera. The pose the model is in also made this picture stand out as I liked how her body was pointed slightly away from the camera but she was tilting her head round to look at the camera.


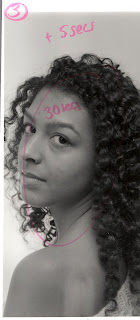


First I set the enlargers aperture to F8, I then applied the Grade 2 filter and made a test strip exposing each section for 5 seconds.

From the first test strip I made I decided I wanted to expose the whole of the next test strip for thirty five seconds. I kept the aperture and filter the same.

The last test strip had some markings on it so before I created the next one I had to clean the negative. I decided to decrease the exposure time by five seconds as I felt the last test strip was too dark. I also decided to add another exposure using a grade two filter for five seconds on only the background and the models hair to add some contrast. I did this by using my hand to cover the models face and slightly moving it to make sure there was no hard edges.

I wanted to add slightly more contrast to the image so I used a grade three filter instead of a grade 2 for thirty seconds. For the second exposure I also used the grade three filter but kept the time the same.

I wanted to experiment with the next test strip to see how it would look if I added contrast to it. I kept the first exposure thirty second exposure the same, but I decided to add another exposure of five seconds using a grade four filter. I still done the third exposure on just the background using a grade three filter for five seconds.

The last test strip I made was far too dark so I decided not to use the second exposure using a grade four filter for five seconds but I kept the other two exposures the same. I decided to make a full print this time however once I printed it I found that there was a mark on the negative which was coming through on the print. I also didn't like the lines on the models neck from where she is looking round at the camera as it gives the photo a forced feel and doesn't give the image the natural feel I was after. As I was not pleased with the final print I decided to print another negative.

Second print
I decided on printing this negative as I felt the model's pose looked more natural and didn't look forced. She still is in a similar pose to the first image as she has her body facing away from the camera but is looking around to the camera. I also liked the way she was looking directly into the camera.


I decided on printing this negative as I felt the model's pose looked more natural and didn't look forced. She still is in a similar pose to the first image as she has her body facing away from the camera but is looking around to the camera. I also liked the way she was looking directly into the camera.
As the image was very similar to the first negative I tried using the same exposure times and settings. I exposed the whole of the test strip for thirty seconds using a grade three filter with the enlarger's aperture set at F8. I then exposed only the background and the models hair of five seconds using the same grade filter.

I was pleased with the test strip so I decided to make a final print using all of the same settings.

The last final print I made looked too dark so I decreased the first exposure by five seconds so it was a twenty five second exposure instead of thirty. I kept all of the filters and the second exposure the same.

I decided to make a final print as I felt the image was the right exposure.

The last image I made has a mark on the model's face so I cleaned the negative and then made a second final print. I'm pleased with my final print as it has a softness to it which is what I wanted to capture. I also liked the models pose as I felt she looked natural. I decided to add contrast to the models hair to make the photo stand out.

No comments:
Post a Comment